The roof of the building protects it from cold, rain and wind. This is as important an element as exterior walls and foundations. The rafter system is the supporting frame of the roof. She takes on all the loads: from structures, from snow and wind. In order to avoid problems during operation, the roof structure of the house must be solid and reliable. Do-it-yourself installation of the rafter system should be done only after careful preparation and study of all the necessary information.
Roof and roof
Before you begin the construction of the roof of a private house, you need to distinguish between two concepts. Lay people are often confused, but builders clearly share the definition of roof and roof. The roof is the whole structure that separates the building from the street from above. The roof structure of a private house includes rafters, all other supporting elements, heat-insulating material, roofing.
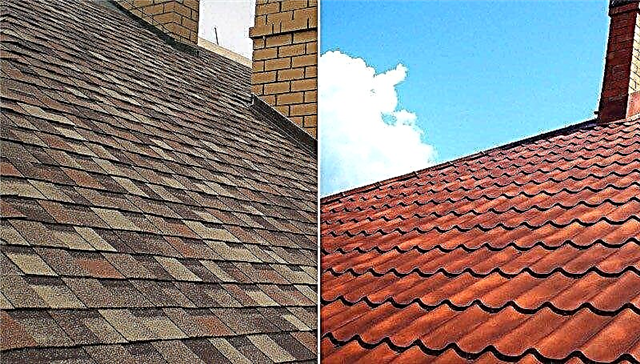
The roof is the top of the roof. She is a roofing. The device of the roof requires careful selection of material. After all, it is from him that the reliability of waterproofing and the comfort of living will depend.
System requirements
To properly mount the rafter system with your own hands, you need to take into account a certain set of rules. Without their consideration, the structure will not be able to effectively resist negative influences from the outside.
First of all, it is worth considering the strength. All elements must withstand the load without breaking.. The device of the roof truss system involves a preliminary calculation of the supporting structures according to the first limit state. It is he who checks the elements of the rafter system for strength.
The second requirement is rigidity.. The maximum deflection is taken into account here. The roof structure of a wooden house or any other should not sag too much. Permissible deformations in the middle of the span are equal to the length of this span, divided by 200. Before starting construction, the structure of the rafter system should be calculated according to the second group of limiting states - stiffness.
Do-it-yourself roof trimming is done so that the structure is lightweight. Otherwise, the load on the walls and foundations greatly increases. It is for this reason that wood is widely used as the main material. The wooden rafter system has sufficient strength, but weighs relatively little. Attention should be paid not only to the roof structure, but also to choose the roofing material wisely. It should not be too heavy. Ceramic tiles have lost their popularity not only because of the cost, but also because the roof of the house, its walls and foundations should be strengthened under it.
Special requirements are placed on the quality of the material. The manufacture of wooden elements should be carried out only from good raw materials. It is worth considering the following recommendations:
- For the main elements use wood 1 or 2 grades. Grade 3 can only be used for crates and other small parts.
- Roof structures of pitched roofs are recommended to be made from coniferous species. They are more resistant to decay and other troubles, because they contain resin. With the same cross section, the permissible span for hardwood will be less.
- Before starting work, all elements must be treated with an antiseptic. This stage of preparation helps prevent many troubles in the future. Optionally, you can treat the tree with flame retardants. This will increase resistance to fire.
- It is better to buy wood from the northern regions, which is harvested in the winter. It is such a material that has the highest quality.
Construction parts
The scheme of the rafter system includes many elements. To understand the drawings and correctly perceive the information, you need to know at least the basic ones. So what does the roof consist of?
First of all, it is a horse, a cornice and stingrays. These elements are the main parts.. The skate is the topmost part of the structure. Eaves or overhang - lower. Slopes are inclined surfaces that are located between the ridge and the cornice.
The construction of the rafter system requires knowledge of the supporting elements. These include:
- Mauerlat - a beam that is laid along the edged walls of the building. Mauerlat is needed to evenly transfer the load from the rafter legs, which rest pointwise. Usually, for its manufacture, a beam with dimensions of 150x150 mm or 200x200 mm is used (for large buildings).
- Rafter legs are inclined beams that transfer the load from the dead weight of the roof, snow and wind to the Mauerlat. Such beams are usually installed from the ridge to the cornice. But when building a hip roof, elements appear that have only one of these points. They are supported on a horse or on a cornice. Such details are called spiders. They usually have the same cross section as the rafters. In fact, sprigs are rafters trimmed on one side.
- Run - beam on which the roof elements are supported. Run can be installed under racks. Another option is the ridge run (crossbar). The rafters at the top point rest on it. The cross section of the run depends on its span, usually 200x200 mm.
- Sloping legs are only needed for hip roofs. They are diagonal rafters, based on the Mauerlat in the corners. The section is taken enlarged, usually 150x200 or 100x200 mm.
- The design of the wooden roof involves the presence of puffs, struts and racks. They are designed to reduce the load on the main elements. When building a house with your own hands, it is important to remember that the racks can not be relied on the span of the ceiling. Installation is possible only on underlying walls or on girders spanning between walls. Such elements can be mounted on the ceiling only if it is designed for such a load and is reinforced in the desired zone.
- The crate is needed in order to make the base for the coating. For metal tiles and seam roofs, the lathing can be sparse from boards 32–40 mm thick. For bituminous tiles, a solid base of boards 25–32 mm thick or moisture-proof plywood is needed.
- In order to make the eaves take off, set the filly. They become a continuation of the rafters. Fastening the filly to the rafter is performed at a length of at least 1 m. The section of the element is usually taken 50x100 mm.
Another element of the rafter system is the farm. This is a one-piece construction, which consists of rafters, puffs, struts and struts, rigidly interconnected. The farm has a triangular shape, and inside is divided into several smaller triangles, which provides it with good stability.
Roof shapes
Roofs of pitched roofs come in many forms. Here it is worth highlighting:
- single slope;
- gable;
- four-slope (tent and hip);
- broken lines.
The most common option is a gable roof or a gable roof. The first requires the installation of gables. Broken lines are relevant for the construction of the attic. First, the rafters go at a steep angle, and then at a smaller angle. This technology allows you to raise the ceiling of the attic. We also recommend reading about the rafter system of a half-hip roof.
Types of rafters
There are two designs:
- with layered rafters;
- with hanging rafters.
The roof device of a wooden house is only possible using the first. This is caused by two rules:
- hanging rafters must be fixed to the Mauerlat rigidly;
- in a wooden house, the rafters should be hinged to the Mauerlat.
These two statements contradict each other, therefore, the rafter system of a wooden house can contain only layered elements.
Curtain beams are elements that rely on the Mauerlat at the bottom and the ridge run at the top. This allows you to reduce the horizontal strut that acts on the walls when the rafters are trying to part and take a horizontal position. Elements can be reinforced by struts or struts. Contractions in this case can be placed through one pair of legs.
Hanging tanks rest only at the lowest point on the Mauerlat. Upstairs they just rest against each other. To make the system of wooden elements not parted, be sure to make puffs. It is better to install them on each pair of legs. This option is characterized by a strong effect of pressure on the external walls, but it allows you to get more free space inside the attic.
Connections
Before you make a rafter system with your own hands, you need to carefully study the nodes. To build your home, do not save time or money. Only in this case, the result will please for many years.
The attachment points of the roof truss system, which deserve special attention, are represented by the following:
- Mauerlat mount to the wall;
- fixing rafters to Mauerlat;
- fixing rafters at the top point;
- splicing rafters along the length.
Mauerlat to the wall
This node can be performed in several ways. The choice largely depends on the material of the wall. The construction of a building from brick, blocks or concrete allows the use of the following methods:
- to the wire;
- on staples;
- on hairpins;
- on the anchor with the device of a monolithic belt along the edge of the wall.
In wooden construction, the upper crown of the wall acts as a Mauerlat. It is connected to the previous ones on the dowel. In a frame house, Mauerlat is the upper wall trim. It is fixed on the frame racks due to the notch and metal corners with holes for self-tapping screws. Read more about mounting the Mauerlat to the wall.
Rafters to Mauerlat
Fasteners are carried out in two ways:
- tough for buildings made of brick, concrete or concrete blocks;
- articulated for wooden houses.
Rigid fastening can be with or without a notch. It is recommended to make the cut on the rafters, and not on the Mauerlat, as this weakens it. In both cases, the leg is rigidly fixed with nails, self-tapping screws, brackets or metal corners.
For hinge use a special part - the slide. They allow the beam without obstacles to mix when the walls of the building shrink.
Additionally, the rafter legs are attached to the wall. This is necessary so that the roof is not torn off by the wind. For fastening use twisting of two wires with a diameter of 4 mm, mounted in a wall on an anchor or ruff. In a wooden house, twisting can be replaced with brackets. Mounting is carried out on each beam or through one.
At the skate level
Sliding elements rest on a ridge run with a notch. Additionally, on both sides make a lining of the board. The pad is also needed for hanging elements. It can be wooden or metal with holes for screws.
Splicing rafters
There are several methods for joining rafters on the roof with your own hands. The choice between them largely depends on the experience of the master. The splicing place is located at a distance of 0.15 span from the support. At the same time, not only the ridge run and Mauerlat, but also struts and racks are considered supports.
There are five ways:
- butt joint;
- oblique cut;
- overlap;
- compound legs;
- twin legs.
To build a high-quality roof, you need to carefully study the technology, choose the right type of rafters and how to connect the elements in important nodes. This is especially important when a rafter system is being built with your own hands.